Author Archives: Brian Katzung

JavaScript Pattern For Deferred/Just-In-Time Subclass Prototype Initialization

Impetus And Use Case

The impetus for this code pattern is to be able to support class hierarchies spanning multiple “async defer“-loaded JavaScript files.

Developing A Solution

A typical SubClass.prototype = new SuperClass or Object.create(SuperClass) won’t work because a super-class may not have finished loading when a subclass is defined.

To avoid order-of-execution issues, just-in-time initialization of the prototype is performed upon the first constructor invocation. The prototype of the default new instance is already bound by the time the constructor function executes, so the constructor function must return a new “new” instance after switching prototypes.

The constructor calls a helper class-method, $c, to perform the just-in-time initialization. This method replaces itself during initialization to prevent reinitialization in subsequent calls.

Both versions of the helper method call a second helper method, $i, to (potentially) perform instance initialization. This method is registered as both an instance method (for polymorphic invocation) and a class method (as a shortcut for prototype.$i, to facilitate super-initialization in subclasses).

To prevent any initialization of instances for subclass prototypes and duplicate initialization of replacement new objects, the constructor accepts its class object as a sentinel value to indicate that no initialization should be applied.

When the sentinel value is supplied to the constructor, the single parameter false is passed from the constructor to $c and from $c to $i. Otherwise, the constructor’s arguments object is passed as the only parameter instead.

Sample Pseudo-Trace

Here’s a simplified view of what the flow of execution might look like creating the first instance of a subclass using a previously initialized super-class for its prototype.

instance = new Sub(...parameters) // Initial super is Object
  Sub.$c_1x(Arguments [...parameters])
    Sub.prototype = new Super(Super)
      Super.$c(false)
        Super.$i(false)
    new Sub(Sub) // New super is Super
      Sub.$c(false)
        Sub.$i(false)
          Super.$i(false)
    Sub.$i(Arguments [...parameters])
      Super.$i(Arguments [...parameters])

Code Pattern

function Class () {
    var c = Class;
    return c.$c.call(this, arguments[0] !== c && arguments);
}
Class.$c = function (args) { // JIT 1x class init helper
    // var c = Class, p = c.prototype; // "Base" classes (Object subclasses)
    var s = SuperClass, c = Class, p = c.prototype = new s(s); // Subclasses
    p.constructor = c; // Subclasses
    c.$c = function (args) { return this.$i(args); }; // Post-init helper
    p.$i = c.$i = function (args) { // Instance init helper
        s.$i.call(this, args); // Subclasses
        if (!args) return this; // Skip init on false
        // Add this.properties here
        return this;
    };
    // Add p.methods here
    // return this.$i(args); // Base classes (original prototype)
    /*
     * We need to return a new "new" to pick up the new subclass prototype.
     * Note that new c(c) invokes $c(false) which invokes $i(false)
     * before returning here for (possible) initialization.
     */
    return new c(c).$i(args); // Subclasses
};

Fighting Back Against Blog Comment Spam

Defensive Steps

Make sure your web site isn’t hosting landing pages for spammers.

A quick and dirty way to do this is with a Google site search. This can be generated with the URL
https://www.google.com/search?q=site%3Ayour.domain
or simply by typing site:your.domain into the search box at Google. This will show all the pages Google has indexed for your domain.

If the Google results show pages you didn’t create, you have some cleanup to do. Make sure you update your access control passwords and that you have up-to-date versions of any content management system (CMS) or other web application software that spammers may be using as a vehicle for access.

Prevent spammers from successfully posting and linking.

If you use blog or bulletin board software on your web site, check the configuration settings that control the posting of comments. Comment moderation, keyword filters, and CAPTCHA systems can be very helpful. If your software doesn’t already use rel="nofollow" for comment links, see if there is a version that does. This will make sure that Google (and probably other search engines) will ignore the links if any spammer’s posts do make it on to your site.

Going On The Offensive

If you want to take a more aggressive approach, you can notify the owners of hacked web sites that are hosting spammers’ landing pages by harvesting the links the spammers submit in the comments to your site. The techniques for this vary, but here is an approach you can use with comments in a WordPress Spam comment folder and access to a Linux command line:

  1. View the first page of comments in your Spam comment folder.
  2. Using the “view source” facility of your browser, search for
    class="comment"
    (this is the code that allows for quick in-line editing of comments)
  3. Cut and paste from the beginning of the containing table to the end of the containing table (from the <table> tag to the </table> tag) into the following command line sequence (you may want to create a script for this):
    perl -ne 'print "$1\n" while /&quot;(http.*?)&quot;/g;' |
    (touch notified; grep -vf notified) |
    sort -u -o notify

    This will extract the URLs referring to spammers’ landing pages in the comments (except for any already recorded in the file “notified”) and puts a sorted, unique list into the file “notify”.

  4. View any additional pages of Spam comments and cut-and-paste the comment source the same way for each additional page. The command sequence will continue to accept input until you enter Ctrl-D by itself on a line (or twice mid-line) to end script processing.
  5. You can generally find a “contact us” or similar page on most web sites to determine who to notify, or you can generally perform a “whois” query on the domain to find administrative or technical contacts.
  6. I use a custom script to generate my email notices, but you can also generate one by hand in your email client and use it over and over again as a template if it has an “edit message as new” facility like the one available in Mozilla’s free Thunderbird client.
  7. Copy the URLs (or even better, just the //domains/) for any sites you notified to the “notified” file and they won’t appear again in your future “notify” results.

This won’t keep the spammers from spamming (they’ll keep telling us, over and over again, which sites they’ve compromised), but with a few minutes of time here and there, you can make the Internet a better place, undo some of their work, and invalidate some of their spam comment links everywhere.

Ruby Sub-Classes/Inheritance, Include, And Extend

Overview

Ruby Objects, Modules, and Classes

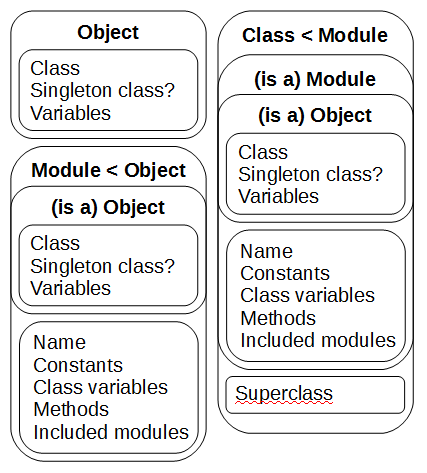
  • In Ruby, an object is a collection of (zero or more) instance variables. It also has a class (see below) and possibly a lazily-created singleton class to hold object-specified methods.
  • A module is an object containing a collection of (zero or more) constants, class variables, instance methods, and included modules. You can include a module in another module and you can extend most objects with a module. Since Ruby 2, you can also prepend a module to a module.
    # Parts of a module
    CONSTANT = "I'm a constant"
    @@class_var = "I'm a class variable"
    @class_inst_var = "I'm a class instance variable" # in a class/module definition
    def self.method; "I'm a class method"; end
    class << self
      def another_method; "I'm a class method too"; end
    end
    def method
      @inst_var = "I'm an instance variable" # inside an instance method
      "I'm an instance method"
    end
  • A class is sub-class of module.
    • Each class has a parent class called a super-class. The child class is called a sub-class. The class inherits the behaviors of the super-class. New classes are sub-classes of the Object class unless you specify otherwise.
    • Classes can typically be instantiated via the new method.
    • Classes are not valid parameters for include or extend.
  • A “def method” adds a method to the “currently open” class or module. A “def object.method” adds a method to the singleton class for the object.
  • When you include a module (let’s call it M1) in another module (let’s call it M2), M1’s constants and instance methods become visible in M2 (as constants and instance methods), and M1 will appear in M2’s included_modules list. M1’s class methods are not added to M2 (but see Including Class Methods below).
  • When you extend an object with a module, the module’s instance methods are added to the object via an automatically-generated anonymous super-class of the singleton class (one for each extending module). In the case where the extended object is a module, the added methods are class methods, not instance methods. The object is unaffected by the module’s constants or class methods.

Confirming The Effects Of include And extend In Modules

The following program can be used to see the affect of using include and extend in modules (and classes):

module Inner
    INNER = "Inner constant"
    def self.inner_cm; "Inner class method"; end
    def inner_im; "Inner instance method"; end
end

module Outer
    include Inner;
    OUTER = "Outer constant"
    def self.outer_cm; "Outer class method"; end
    def outer_im; "Outer instance method"; end
end

module Extension
    EXT = "Extension constant"
    def self.ext_cm; "Extension class method"; end
    def ext_im; "Extension instance method"; end
end

class MyClass; include Outer; extend Extension; end

puts "Constants: " +
    (MyClass.constants(true) - Object.constants(true)).inspect
puts "Class methods: " + (MyClass.methods - Object.methods).inspect
puts "Instance methods: " +
  (MyClass.instance_methods - Object.instance_methods).inspect

The output is as follows:

Constants: [:OUTER, :INNER]
Class methods: [:ext_im]
Instance methods: [:outer_im, :inner_im]

Method Resolution Order

The following program can be used to show the class/module hierarchy and order of method resolution for sub-classing (inheritance), include, and extend:

module Mod1; def m; puts "Mod 1"; super; end; end
module Mod2; def m; puts "Mod 2"; super; end; end
module Mod3; def m; puts "Mod 3"; super; end; end
module Mod4; def m; puts "Mod 4"; super; end; end
module Mod5; def m; puts "Mod 5"; super; end; end
module Mod6; def m; puts "Mod 6"; super; end; end
class Base; def m; puts "Base"; end; end
class Sub < Base
    include Mod1, Mod2; include Mod3
    def m; puts "Sub"; super; end
end
o = Sub.new.extend(Mod4, Mod5).extend Mod6
puts "Sub ancestors: " + o.class.ancestors.inspect
o.m

Regrettably, the include and extend methods process their parameters from last to first, so you need to know that method resolution order is not simply last-to-first encountered when called with multiple modules. The output is as follows:

Sub ancestors: [Sub, Mod3, Mod1, Mod2, Base, Object, Kernel, BasicObject]
Mod 6
Mod 4
Mod 5
Sub
Mod 3
Mod 1
Mod 2
Base

Pictorially, it looks like this (with the number in parentheses indicating the search order):
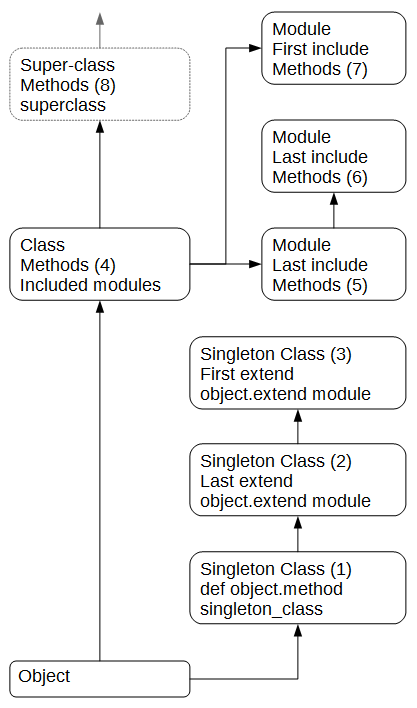
Ruby extend/include/Sub-class Method Resolution Order

Including Class Methods

It is also possible to add class methods as part of an include or to add instance methods as part of an extend using the included or extended callbacks, respectively:

module Inc_Me
  def inst_m; end
  module ClassMethods; def class_m1; end; end
  def self.included (base)
    base.class_exec do
      extend ClassMethods     # method 1 - extend with named sub-module
      Module.new do           # method 2 - extend with anonymous module
        def class_m2; end
      end.tap { |mod| extend mod }
      def self.class_m3; end  # method 3 - add directly to the class
    end
  end
end

module Ext_Me
  def class_m; end            # instance method here, class there
  module InstanceMethods; def inst_m1; end; end
  def self.extended (base)
    base.class_exec do
      include InstanceMethods # method 1
      Module.new do           # method 2
        def inst_m2; end
      end.tap { |mod| include mod }
      def inst_m3; end        # method 3
    end
  end
end

module M1; include Inc_Me; end
puts "M1 class methods: " + (M1.methods - Object.methods).inspect
puts "M1 instance methods: " +
  (M1.instance_methods - Object.instance_methods).inspect
puts "M1 included modules: " + M1.included_modules.inspect, ''

module M2; extend Ext_Me; end
puts "M2 class methods: " + (M2.methods - Object.methods).inspect
puts "M2 instance methods: " +
  (M2.instance_methods - Object.instance_methods).inspect
puts "M2 included modules: " + M2.included_modules.inspect

which produces:

M1 class methods: [:class_m3, :class_m2, :class_m1]
M1 instance methods: [:inst_m]
M1 included modules: [Inc_Me]

M2 class methods: [:class_m]
M2 instance methods: [:inst_m3, :inst_m2, :inst_m1]
M2 included modules: [#<Module:0x00000000cbd108>, Ext_Me::InstanceMethods]

It is better to use the include-with-extend method (as in module Inc_Me) than the extend-with-include method (as in module Ext_Me), as the primary module name gets included in the included_modules list.

It is also better to extend a sub-class (methods 1 or 2) rather than adding the class methods directly (method 3), since the extended modules are each added to a separate, invisible super-class instead of to the including module itself. The benefit here is that the behaviors can be chained using super if desired, as shown by this code:

module Inc1
  module ClassMethods; def m1; puts "Inc1 m1"; super rescue nil; end; end
  def self.included (base)
    base.class_exec do
      extend ClassMethods
      Module.new do
        def m2; puts "Inc1 m2"; super rescue nil; end
      end.tap { |mod| extend mod }
      def self.m3; puts "Inc1 m3"; super rescue nil; end
    end
  end
end

module Inc2
  module ClassMethods; def m1; puts "Inc2 m1"; super rescue nil; end; end
  def self.included (base)
    base.class_exec do
      extend ClassMethods
      Module.new do
        def m2; puts "Inc2 m2"; super rescue nil; end
      end.tap { |mod| extend mod }
      def self.m3; puts "Inc2 m3"; super rescue nil; end
    end
  end
end

module M; include Inc2, Inc1; end
M.m1; M.m2; M.m3

which produces:

Inc2 m1
Inc1 m1
Inc2 m2
Inc1 m2
Inc2 m3

The included Callback And Nested Includes

If your module includes other modules, the included callbacks for the other modules (if present) will be called when they are included in your module, but not when your module is included elsewhere. This code shows the problem:

module M1
  CONST1 = 'M1 constant'
  module ClassMethods; def cm1; 'M1 class method'; end; end
  def im1; 'M1 instance method'; end
  def self.included (base)
    puts "#{self} included in #{base}"
    base.class_exec { extend ClassMethods }
  end
end

module M2
  include M1
  def self.included (base); puts "#{self} included in #{base}"; end
end

module M3; include M2; end

puts "M2 class methods: " + (M2.methods - Object.methods).inspect
puts M3::CONST1
puts "M3 class methods: " + (M3.methods - Object.methods).inspect
puts "M3 instance methods: " +
  (M3.instance_methods - Object.instance_methods).inspect

which produces:

M1 included in M2
M2 included in M3
M2 class methods: [:included, :cm1]
M1 constant
M3 class methods: []
M3 instance methods: [:im1]

The including module’s included callback should therefore call the included callback for any included modules if none of the base object’s ancestors have previously included the other modules:

def M2.included (base)
  puts "#{self} included in #{base}"
  M1.included base if M1.respond_to?(:included) &&
   (!base.respond_to?(:superclass) || !base.superclass.include?(M1))
end

which, after the change, produces:

M1 included in M2
M2 included in M3
M1 included in M3
M2 class methods: [:included, :cm1]
M1 constant
M3 class methods: [:cm1]
M3 instance methods: [:im1]

Download It

A Ruby gem (called extended_include) based on this posting is available at rubygems.org.

Ruby Gem Sarah Version 2.0.1 Released

Ruby Gem Sarah version 2.0.1 has just been released.

What Is It?

Sarah is a combination sequential array, sparse array, and (“random access”) hash.

Ruby’s own array literal and method calling syntaxes allow you to specify a list of sequential values followed by an either implicit or explicit hash of name/value pairs stored at end of the array. Sarah takes this concept a few steps further.

Values with sequential indexes beginning at 0 are typically stored in the sequential array for efficiency. You can also assign values with non-sequential indexes, and these values are stored in the sparse array (which is actually implemented as a hash). The sequential and sparse arrays work together like a traditional Ruby array, except that there can really be empty holes with no values (as opposed to having nil values as place-holders where no other value has been set in the case of a traditional Ruby array). You can perform most of the typical array operations, including pushing, popping, shifting, unshifting, and deleting. These result in the re-indexing of sparse values in addition to sequential values after the point of insertion or deletion, just as if they had all been stored in a traditional Ruby array.

Values stored with non-integer keys are stored in a separate “random access” (i.e. unordered) hash. Re-indexing of the sequential and sparse arrays does not affect these key/value pairs.

Instead of accessing sparse and random-access values through a hash at the end of the array first, these values all appear at the same level. Compare:

# Traditional Ruby array with implicit hash
a = ['first', 5 => 'second', :greeting => 'hello']
# a[0] = 'first'
# a[1] is a hash
# a[1][5] = 'second'
# a[1][:greeting] = 'hello'

# Using a Sarah
s = Sarah['first', 5 => 'second', :greeting => 'hello']
# s[0] = 'first'
# s[5] = 'second'
# s[:greeting] = 'hello'

Why Should I Use It?

Sarah provides a pure-Ruby sparse array implementation, and can easily be the basis for a pure-Ruby sparse matrix implementation. It also provides efficient linear storage and manipulation in case you don’t know in advance if your data will be sequential or sparse in nature (i.e. it can vary significantly based on user input).

By default, negative indexes are interpreted relative to the end of the array. However, if it’s appropriate to your problem domain, Sarah also has a mode that supports negative indexes as actual indexes. In this mode, insertions and deletions do not result in value re-indexing.

Ruby Gem XKeys Version 2.0.0 Released

Ruby Gem XKeys version 2.0.0 has just been released.

What Is It?

XKeys is a module that can be included in Ruby classes or used to extend Ruby objects to provide convenient handling of nested arrays or hashes, including Perl-like auto-vivification, PHP-like auto-indexing, and per-access default values.

Perl-Like Auto-Vivification For Ruby

A fairly common Ruby programming question, especially for current and former Perl programmers, is how to automatically generate intermediate nodes in nested array and hash structures.

Say, for example, that you want to keep some sort of running tally grouped by year, month, and day. In Perl, this is easily accomplished as follows:

my %tally; # top-level hash of tallies
# and later...
++$tally{$year}{$month}{$day}; # increment tally by year/month/day

Perl will automatically create nested arrays or hashes as you attempt to write to them. They just “spring to life” when you need them; the process is called auto-vivification.

In straight Ruby, implementing the example is more cumbersome…

tally = {} # top-level hash of tallies
# and later...
tally[year] ||= {} # make sure year hash exists
tally[year][month] ||= {} # make sure month hash exists
tally[year][month][day] ||= 0 # make sure day value exists
tally[year][month][day] += 1 # increment tally by year/month/day

Alternatively, you can provide a block of code to the top-level hash to create new hashes whenever a non-existent node is referenced, but they are created when reading (getting) the nested structure instead of when writing (setting) the nested structure, so you get new nodes even when you’re “just looking”.

Using the XKeys gem, the code becomes easier again:

require 'xkeys'
tally = {}.extend XKeys::Hash
# and later...
tally[year, month, day, :else => 0] += 1

The “:else” value is used when the value doesn’t exist yet (this avoids generating an error trying to add 1 to nil on the first tally of each day). Missing nodes are automatically added, but only on write, not on read.

PHP-Like Auto-Indexing For Ruby

PHP allows you to auto-index items being added to the end of an array by leaving the array subscript empty. For example:

$languages = array();
$languages[] = 'Perl'; # assigned to $languages[0]
$languages[] = 'PHP'; # assigned to $languages[1]
$languages[] = 'Ruby'; assigned to $languages[2]

XKeys allows you to do something similar using the symbol :[] with arrays or other types of containers supporting the #push method. This is called “push mode”. In Ruby using XKeys, it looks like this:

require 'xkeys'
languages = [].extend XKeys::Auto
languages[:[]] = 'Perl' # languages.push 'Perl' ==> languages[0]
languages[:[]] = 'PHP' # languages.push 'PHP' ==> languages[1]
languages[:[]] = 'Ruby' # languages.push 'Ruby' ==> languages[2]